Laminar Integration with Amazon Security Lake
Amazon Security Lake is a fully-managed security data lake service that helps you analyze security data, so you can get a more complete understanding of your security posture across the entire organization.
The Laminar integration with Amazon Security Lake lets you send Laminar policy violation information discovered in your environment to Security Lake. If you are using a SIEM that supports Security Lake you can import this information from Laminar to see all of your security information in a single pane of glass. For more information about the integration, see the Laminar blog announcing integration with AWS Security Lake.
This document describes how to connect your Laminar account to the AWS Security Lake. To do this:
- Identify Security Lake Delegated Administrator account
- Create a custom source for Laminar
- Configure Security Lake from Laminar
- Validate and troubleshoot
Learn about setting up a Security Lake if you have not set one up yet.
Identify Security Lake Delegated Administrator account
To connect Laminar to your Security Lake environment you must sign in to AWS under the Security Lake Delegated Administrator account. Ask your system administrator if you don’t know which account this is. You’ll need this information when you connect Laminar to Security Lake.
Create a custom source for Laminar
This section describes how to create a custom source for Laminar.
To create the source:
- From the AWS Security Lake console, select Custom sources.
- Select Create custom source. The Create custom data source page opens.
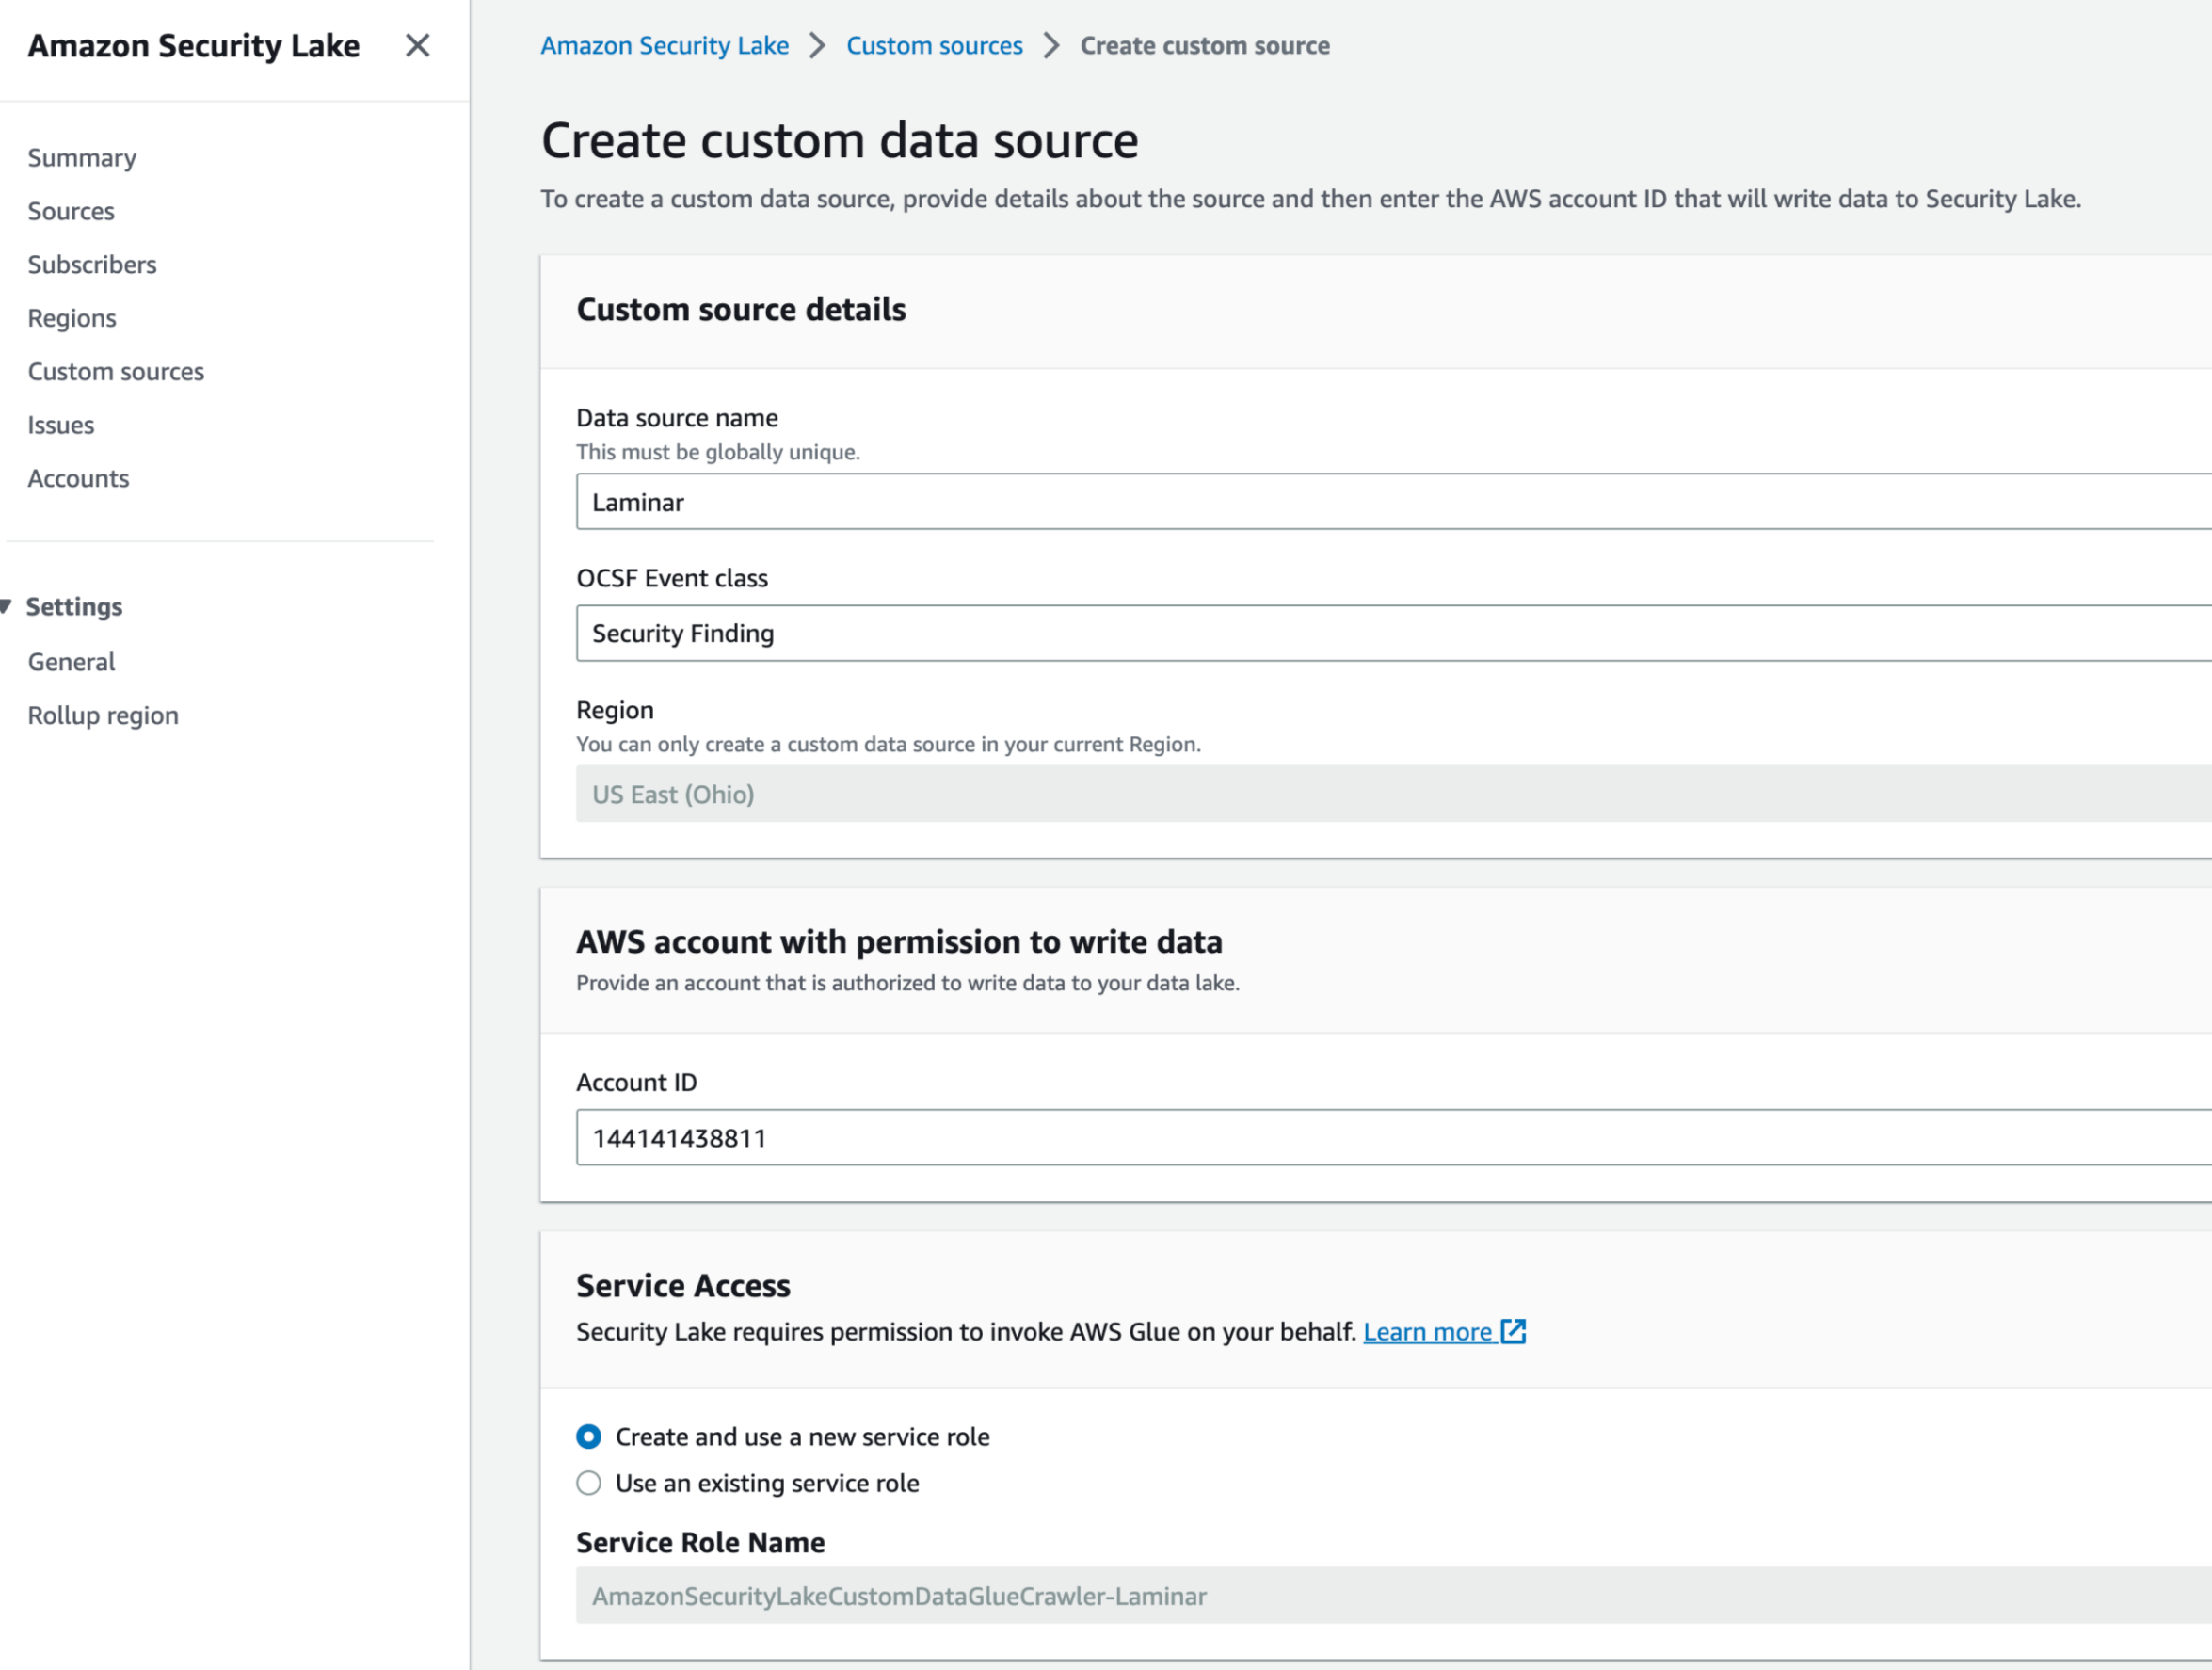
- Enter Laminar as the Data source name.
- Enter Security Findings as the OCSF event class.
- In the AWS account with permission to write data section, enter 144141438811 as the Account ID. This is the Laminar ID.
- In the Service Access section, create and use a new service role or use an existing service role for the Glue crawler. AWS Glue is used to crawl the data Laminar pushes to the Security Lake. As a result, it needs permission to read it. This is not related to Laminar’s permissions used to push Laminar findings to this bucket. Learn more about AWS Glue crawler.
- Select Create. An AWS Service Role name is created. This role can be assumed from the provided account (Laminar account). The role has permission to push files into the Security Lake bucket, under the proper prefix.
- On the page that opens, copy the Bucket name under the Location section. You’ll need the name when configuring the integration from the Laminar console.

Configure Security Lake from Laminar
This section describes how to connect Laminar to Security Lake.
To configure:
- Sign in to Laminar and select the Settings icon from the side menu.
- Select Integrations, and then navigate to Security Lake.
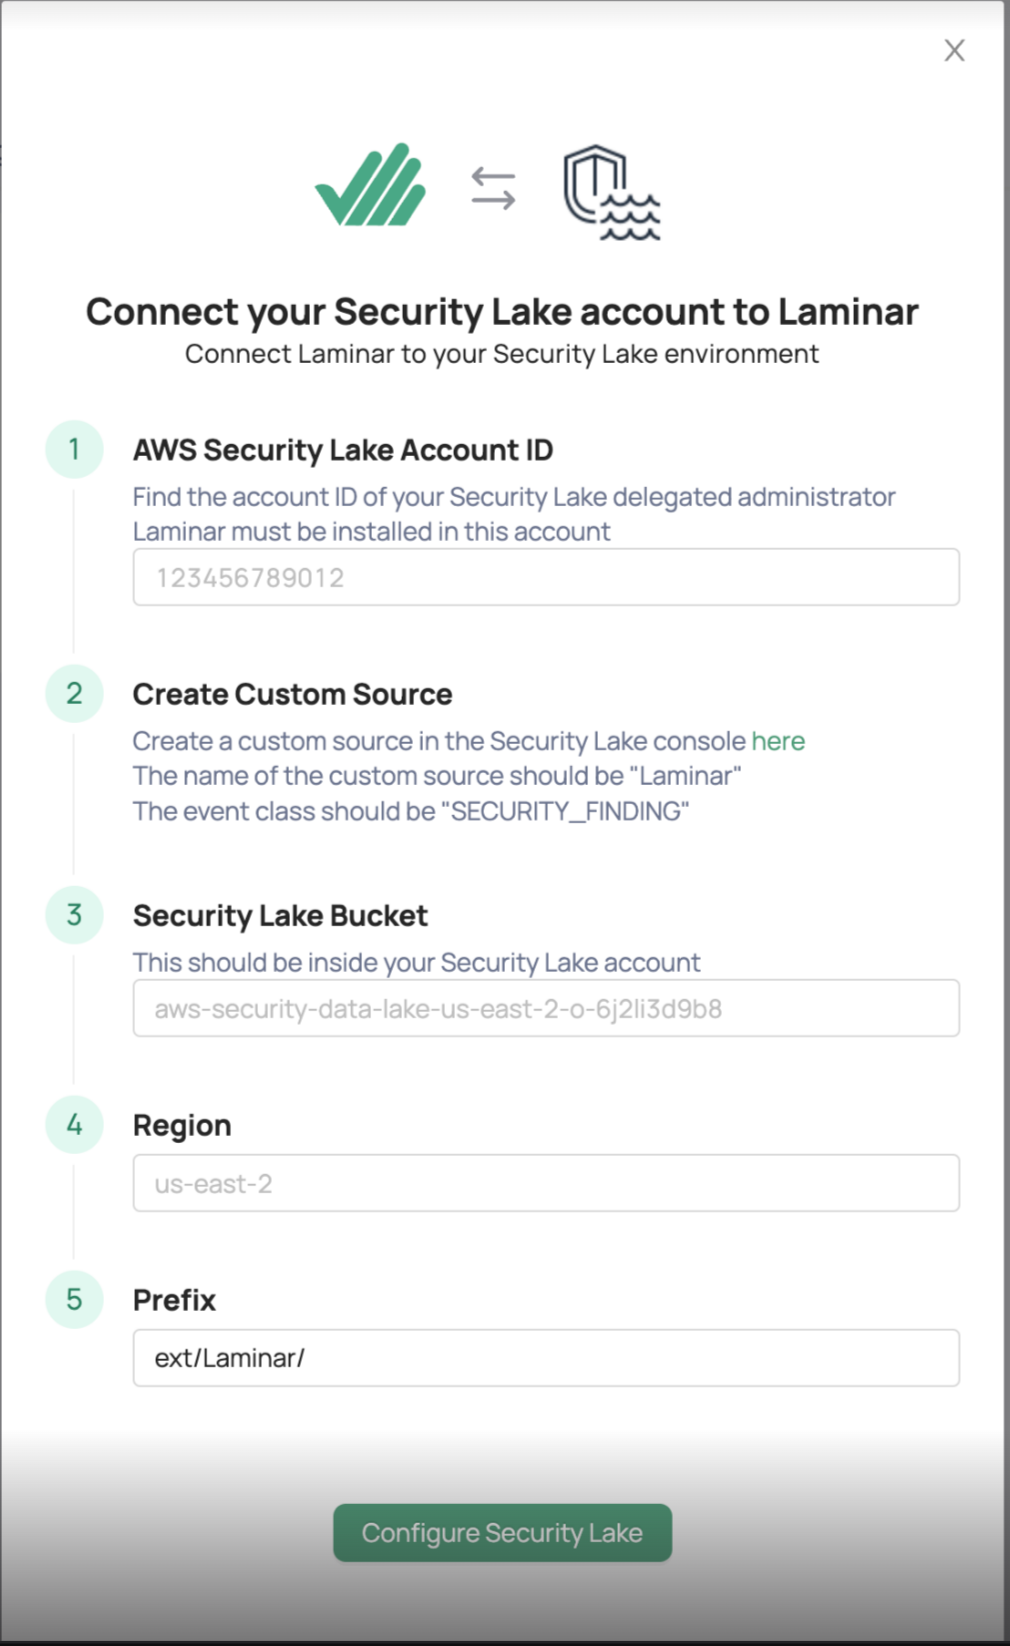
- Enter the account ID of your Security Lake Delegated Administrator as the AWS Security Lake Account ID.
- Enter the target bucket name as the Security Lake Bucket. Use the following format: s3://{bucket_name}/ext/Laminar. The target name is shown on the Security Lake Custom sources page, under Location. Copy the bucket name from the Location field.
- For Region, enter the region the account is associated with.
- For Prefix, enter ext/Laminar/.
- Select Configure Security Lake.
Validation and troubleshoot
After configuring Security Lake, data will be synced to your Security Lake bucket. Check the bucket and make sure new files are written under the prefix. It may take up to 5 minutes for data to appear. Visit the lake formation console and make sure that the logs are properly ingested.
Contact your Laminar solution engineer at support@laminarsecurity.com if you have an issue validating or troubleshooting.
Troubleshooting: Logs are not written to S3 bucket
Make sure 5 minutes have passed since configuring Security Lake.
If new files do not appear, make sure that a role named AmazonSecurityLake-Provider-Laminar-{region} was created and can be assumed by Laminar’s account id (144141438811).
Visit the Security Lake settings page and double-check that the configuration looks as expected.
Troubleshooting: Data does not appear in Lake Formation
First, make sure that files are actually written to your S3 bucket. Data may take up to an hour to appear in Lake Formation. If you wish to view data sooner you may manually run the Glue job created by AWS Security Lake.
If data still does not appear, you may have a problem with the permissions of your Security Lake Glue Role. View the logs of the Security Lake crawler here.
OCSF Information
Laminar converts all policy violations to OCSF Security Findings as described here. The mapping of Laminar types to OCSF types is straightforward:
"category_name": "Findings",
"category_uid": 2,  # Findings
"class_name": "Security Finding",
"class_uid": 2001,  # Security Finding
"time": <laminar_violation.creation_date>,
"finding": {
    "title": <laminar_violation.title>,
    "uid": <laminar_violation.id>,
},
"message": <laminar_violation.description>,
"metadata": {
    "product": {
        "name": "Laminar DSPM",
        "vendor_name": "Laminar",
    },
    "version": "1.0.0",
},
"resources": [
    {
        "account_id": issue.data_asset_account,
        "criticality": issue.data_asset_sensitivity,
        "name": issue.data_asset_name,
        "uid": issue.data_asset_id,
        "type": issue.data_asset_type.type,
    }
],
"severity": issue.severity,
"type_uid": 200101,
"type_name": "Security Finding: Generate",
In the event of a breaking change to the OCSF format, Laminar will proactively reach out to affected customers to assist you in updating the schema.